10.19.2011

more halloween decorations

i told you i had a few more projects for halloween to share with you.  so, here they are...

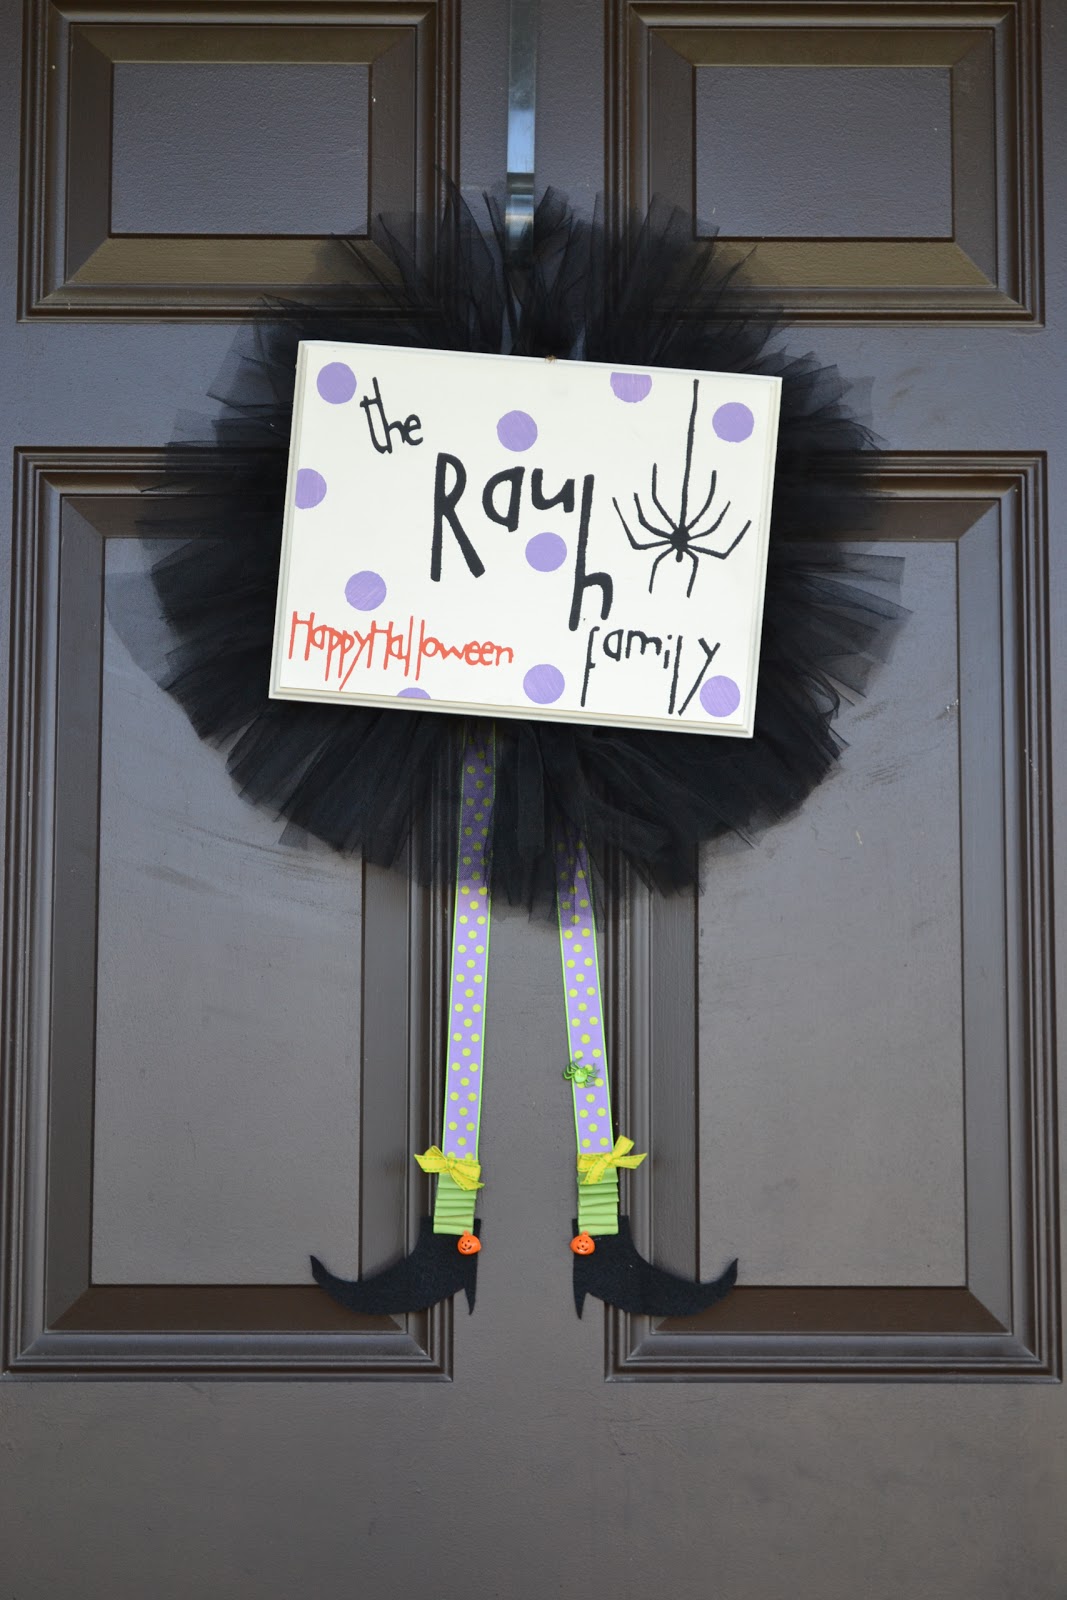
the first is my crafty witchy wreath that is currently hanging on my front door.  my friend, elise, and i decided to start our own craft club.  yep, just two members right now, but i don't care.  i am so excited to have some adult conversation and someone else to craft with!!  the witch wreath was our first project.  super easy.  you can follow the same great tutorial we did.  found it on lemon tree creations here.  instead of free handing the sign, we used my cricut to create stencils out of contact paper.  worked great! 


the other project i wanted to share is my halloween mantel.   


i made the pennant out of burlap, ribbon, chip board letters, plastic spiders, and googly eyes.  use what you have on hand!

to make it i cut triangles out of burlap.  no need for sewing.  yay.  next i found some orange and black ribbon that i had on hand.  i hot glued it to the top of the triangles.  after the glue was dry, i trimmed the extra off.  the letters were a bluish color, so i just gave them a few quick coats of black spray paint.  after they dried i hot glued them to the triangles.  i added some plastic spiders and googly eyes to the first and last triangles.  these were things i had on hand, thanks to resigning my teaching position and having to clean out my classroom.  :)  to hang it on my mantel, i used a couple of 3M plastic hooks with the removable sticky pads.  i used some twine and cute little clothespins that i found in the office supply aisle of wally world.  here's another close up...


nothing fancy, but the girls love it.  and that was the WHOLE point!

the other halloween-ish items on the mantel included an orange, beady garland from joanns @ half off (woop, woop), some candles with black tulle tied around them (had on hand = FREE), and 4 ghoulish candle holders.  i used mason jars that i had on hand.  the black ones are just wrapped with black tulle.  the ghosts are wrapped with toilet paper (because i didn't have white crepe paper on hand) and then some googly eyes hot glued to them.  waa laa.  some cheap, easy decorations for the month of october!


my entryway

the vase i scored on clearance at joanns for $1.67.  i added an orange, beady pick and some branches spray painted black.  the halloween sign was also from joanns for half off.  (woop.  but only one woop because it was still around 10 bucks...)

10.17.2011

ring around the rosy, halloween-style tutorial

boo!  the bewitching hours are upon us.  no, not the typical kind that visit my house every night before bath time...the halloween kind. 

i decided to put some effort into making decorations for the house specifically for halloween month.  i have a few that i plan to share with you all before the 31st.  tonight's is my thriftiest one. 
ring around the rosy ghosts
late one evening i found inspiration somewhere in blogland but have not been able to find it since that night.  couldn't even find it when i needed the instructions.  sorry followers, i cannot direct you to the spot but i will not let you down.  i managed to take pics of each step.  yay me. 

for this project you will need:
dowel rods--i used 3/4" from joanns, 1 per ghost
newspaper
duct tape
white trash bags--3 per ghost
black permanent marker

i had all of this on hand except the dowels.  i bought 5 of them at 99 cents a piece.  under $5 for this project!!  okay, onto the steps...

step 1:
wad newspaper into a ball and secure with  a few wraps of duct tape.  i think i used about 5 full sheets form a newspaper for each head.  then attach the ball to a dowel rod with a few more wraps of duct tape.  i sort of shoved the rod into the ball before taping like a mad woman. 

step 2:
pull a trash bag over the head.  i decided to use the bottom corner of the bag as the pointy part of its head. 

step 3:
make a hole in the middle of the bottom of another trash bag.  then slip this bag onto the rod and over the first bag until you reach the head.


step 4:
fold the 3rd trash bag diagonally once.  then gather it in the middle, like so...

this bag will be tied at the neck of the of the ghost.  it serves two purposes: to keep the 2nd bag where it belongs and to become the arms of the ghost. 

step 5:
use the marker to draw a face on the ghost head.  i chose to just draw eyes.


step 6:
after finishing all of your ghosts, take them outside to your desired location.  i chose to put them around a tree in our front yard.  shove the dowel into the ground at an angle so your ghost is leaning backward a bit.  space them so that the arms can reach each other.  tie the arms together so it looks like the ghost are holding hands.  enjoy your cheap craftiness.  all the neighborhood kiddies will!


10.16.2011

kiddo bathroom makeover

holy cow...contrary to belief...i am alive. so much has happened since my last post in april. i'd hope so, right? i mean, that was 6 flippin months ago. in may, the hubs and i found out we are expecting our third child. gulp. after the initial shock, we are so stinking excited. it's a boy! baby brother is scheduled to arrive november 17, if not sooner.

since finding out about our butterball, i have made list after list of all the projects that i need want to get done before 11/17. the first on my list was the kids' bathroom. i have been dying to paint that room since my first pregnancy but held off until we found out the sex of our "final baby".

this is the ultimate inspiration behind the personality and decor of the bathroom.  i found this print a few years ago at an art show in south haven, michigan.  bought the frame and the mat at hobby lobby for half off.  the mat was originally white so i painted it with some craft paint i had on hand. 

i settled on a bright green for the walls but was afraid of how overwhelming it might look in a small room. then, i searched the internet and found inspiration for adding board and batten to a room, here and here.

i decided to paint the top half of the room first. then the hubby helped put the boards up. lots of caulking, then painting the bottom half. i love how it turned out!

i made the sign that hangs above the toilet and the one to the left of the sink. i just used paints i had on hand, scrap wood, and my cricut. woop! woop!


i found the coordinating rugs, trashcan, toilet tote, and container at target.


the towels are from home goods. i love the bright colors!
and yes, we removed the door that separated the sink from the toilet/shower room.  it was always open and just in the way.  don't worry, it'll be replaced after my babies can bathe by themselves.  :)
just add cute babies and water...

4.14.2011

sew stinkin' cute

hi all!  it has been a whirlwind the last few weeks.  i have been trying to spring clean the house during nap time but somehow manage to find a new project to do in each room.  so, needless to say, i am still not done with the flippin' cleaning!  ugh.  my goal is to be complete by the end of april though...

in order to spring clean the dining room, i had to finish up some sewing projects first.  the dining room is magically transformed into my sewing room every time i think of a new sewing project.  i wish i could say that it is an organized and accommodating area but it is not.  i feel all crammed in between the table, large house plant, and wine bar.  anyhoo, i did manage to finish my sewing.  now i just have to find the motivation to clean that room. boo.

i made another apron for each of my girls plus a set of oven mitts and a couple small batches of cookies. :)


i love love love love how the aprons turned out!  i used a tutorial from creation corner that you can find here.


the cookies are made of felt.  i made chocolate chip and iced sugar cookies with sprinkles.  yum!  to make the cookies i just used something round to trace the circle.  for the icing i just free-handed a squiggly circle that was smaller than the outer circle.


i like to use heat n' bond lite (HNBL) for tracing.  you trace your pattern on it, then iron it onto fabric.  then you can peel the "tracing" off and iron it to another piece of fabric.  for example:  i ironed the cookie pattern onto the felt first.  then i cut out the pattern.  since it is ironed onto the fabric it makes it easier to cut out because the fabric is stiffened up from the heat n' bond.  once my cookie circle was cut out, i peel the tracing off then ironed the circle onto another piece of felt (same color).  this way my cookies are double thick.  i think they hold their shape better.  i actually sew around the edges before cutting the extra fabric off.  it's my way of cheating.  makes my cookies' edges look perfect! :)


for the chocolate chip cookies, i used tan felt and dark brown for the chips.  to make the chips, i ironed some HNBL onto the felt, then cut out triangles.  next, i peeled the HNBL off the back then ironed the chips to the cookies.  i sewed around the edges of each chip so they will stay put forever.  if you do this step though, you have to sew the chips on before making your cookie double thick.  otherwise you will see all your stitches on the back side of the cookie.


for the sugar cookies, i did basically the same thing as the chocolate chip cookies.  i used ivory felt for the cookies.  you can use any color for the icing.  the sprinkles are made using embroidery thread.  to make the cookies:  first, i cut my cookies and icing out using HNBL.  next, i made my sprinkles on the icing using french knots.  you can find a super easy tutorial here.  after making the sprinkles, i ironed the icing onto the cut out cookie.  then, i sewed around the edge of the icing.  next, i ironed the cut out cookie onto another piece of ivory felt.  then sewed around the edge of the cookie.  finally, i cut around the cookie edge so my edges look perfect.  :)

3.24.2011

chef sadie and chef leni

just a quick post about the super adorable aprons i made for the girlies.  i found some cute material at joann fabrics. both have retro looking trees on them.  loved it.  had to have it.  lucky for me, simplicity patterns were $1.99 while i was there.  score!  here's the pattern i chose...
i followed the pattern (the one on the left) to a T with ONE exception.  the pattern calls for you to make the tie out of the same material as the rest of the apron.  i chose to use grosgrain ribbon instead for two reasons.  1) it gave the apron a contrasting color and 2) it was super easy to cut the ribbon compared to folding and sewing material into a long string (one long piece that ties in the back but is also the adjustable neck strap).  honestly, easy peasy.  i loved how they turned out.  and the girls wore them the rest of the day. :)


3.22.2011

toy tower revamp

hi all!  i finished a project. yay! 

it all started a few months ago when i found this baby at goodwill.

kinda cute, right?  they were asking $10 for it!  what?  it didn't even have all the parts plus it was super wobbly.  i talked them down to $5.  nothing a little love can't take care of...  well, maybe it takes a bit more than just love...  the bottom basket used to be just like the blue and pink ones.  i took it apart when i got it home to get started on making new ones.  i took it apart so i could figure out how to make new ones but it was harder than i thought.  thus, being put off until now. 

i found a super cool tutorial on how to make fabric covered boxes on the smallest sparrow blog.  she explained it in three posts which you can see here, here, and here.  and this is my version, very similar but a few tweaks.

first i measured the existing baskets.


then i rummaged through the trash to find some boxes to use.  yep, the trash.  don't judge...it was free.  then, i measured out my pieces.


and then cut them all out.  shew, my hand hurt.


now it was time to piece it together.  i laid out each box then taped the pieces together using duct tape.


with my fabric folded in half, right sides together, i traced the box on it.  i also traced a second line about 1 inch from the first tracing.


next i cut the tracings out.  be sure to keep your fabric doubled so you cut two pieces at the same time.  you can see a third line in the picture below.  it is 1/8 inch from the second line.  this is to take in account the thickness of the cardboard.  i know, confusing right now, but it works.  once you have cut all the pieces out, you are ready to prep the inside box piece.  (that is the piece with the tracings on it)  fold each edge to the 1/8 inch tracing.  i glued it using tacky glue.  then i ironed it to "set" the folds.


after all edges are glued and ironed down, you are ready to work on putting the fabric on the boxes.  to do this you will use the second piece of fabric.  (the one without the tracings)  lay your fabric piece wrong side up.  apply mod podge to the center piece of the box.  then flip the box over onto the fabric and press it down.  make sure it is lined up correctly!  flip it back over and smooth out the fabric so there are no wrinkles.  continue the same process for each flap of the box. 


snip the fabric on each inside corner to help you with the next folding step.


you need to wrap the fabric around the edges and glue it down.  the corners need folded like when you are wrapping a gift.


i added clothespins to the corners to help keep them down while it dries.  when you are finished with this step, it should look something like this...


i let my boxes dry overnight before starting the inside.  this step is much like the outside step without having to wrap the fabric around the edges.  you also have to add the ribbon during this step.  unfortunately, i totally spaced taking pictures of this step!!  whoops!  still new to this blogging tutorial thing...luckily, you can check out how to do it here.  i did a couple things differently.  one--i added two ribbon loops to one of the long edges because my boxes need to hang on my toy tower.  two--i could NOT get my sewing machine to cooperate.  it would not sew through my box at all, so i reinforced all my ribbon by using hot glue to attach it to the inside of the boxes. 

after i finished the inside of the boxes, i propped them up using some mixing bowls and let them dry overnight again.  if you prop them, your boxes will dry in a boxy shape which helps NOT put so much stress on your ribbons to tie them shut.

now for the frame.  time for spray paint.  i used rustoleum in colonial red.  very pretty.  thank heavens for the nice weather!  i was able to get a couple of coats on the frame outside! yay!  not stinky, fumey garage!


here's the final product...  she is so pretty!  i love the fabric against the red frame.  :)


not too bad, eh?  from trash to treasure :)